How to deploy an OWL-ViT object recognition model to a REST API

By
Harry Glaser, Co-Founder & CEO
Thank you! Your submission has been received!
Oops! Something went wrong while submitting the form.

Introduction

OWL-ViT is a new object detection model from the team at Google Research. It allows you to identify an object in one image (the “query image”) and then find that same object in any number of target images. Building on Google’s foundational Transformers work, the model creates an embedding using the query image and the prompt (a bounding box). That embedding represents an object, and can be compared to objects found in any other image!

Google has released the OWL-ViT code as part of its scenic library. The self-documenting demo is a very slick interactive Colab notebook that lets you click-and-drag on one image, and then shows you the found object in subsequent images. 

While the demo is very cool, it doesn’t necessarily help you deploy OWL-Vit into production! In a real production environment, you’ll want inference (object detection and getting embeddings from prompts) to run server-side. Whereas the click-and-drag or any other interaction to generate the prompt will likely run client-side. 

In this post, we’ve separated OWL-ViT’s model API from the interactive Colab demo to show how you can call those APIs directly, and how you can deploy it to production. Once it’s in production, you can call the API with the URL of the query image, the bounding box of the image identified in the query image, and the URL of the source image. The REST API will return an array of boxes, each with coordinates, of the object found in the target image. 

For our demo we’ll use Google’s supplied circuit board image and the bounding box of a microchip in the image:

Google’s supplied circuit board image and the bounding box of a microchip in the image

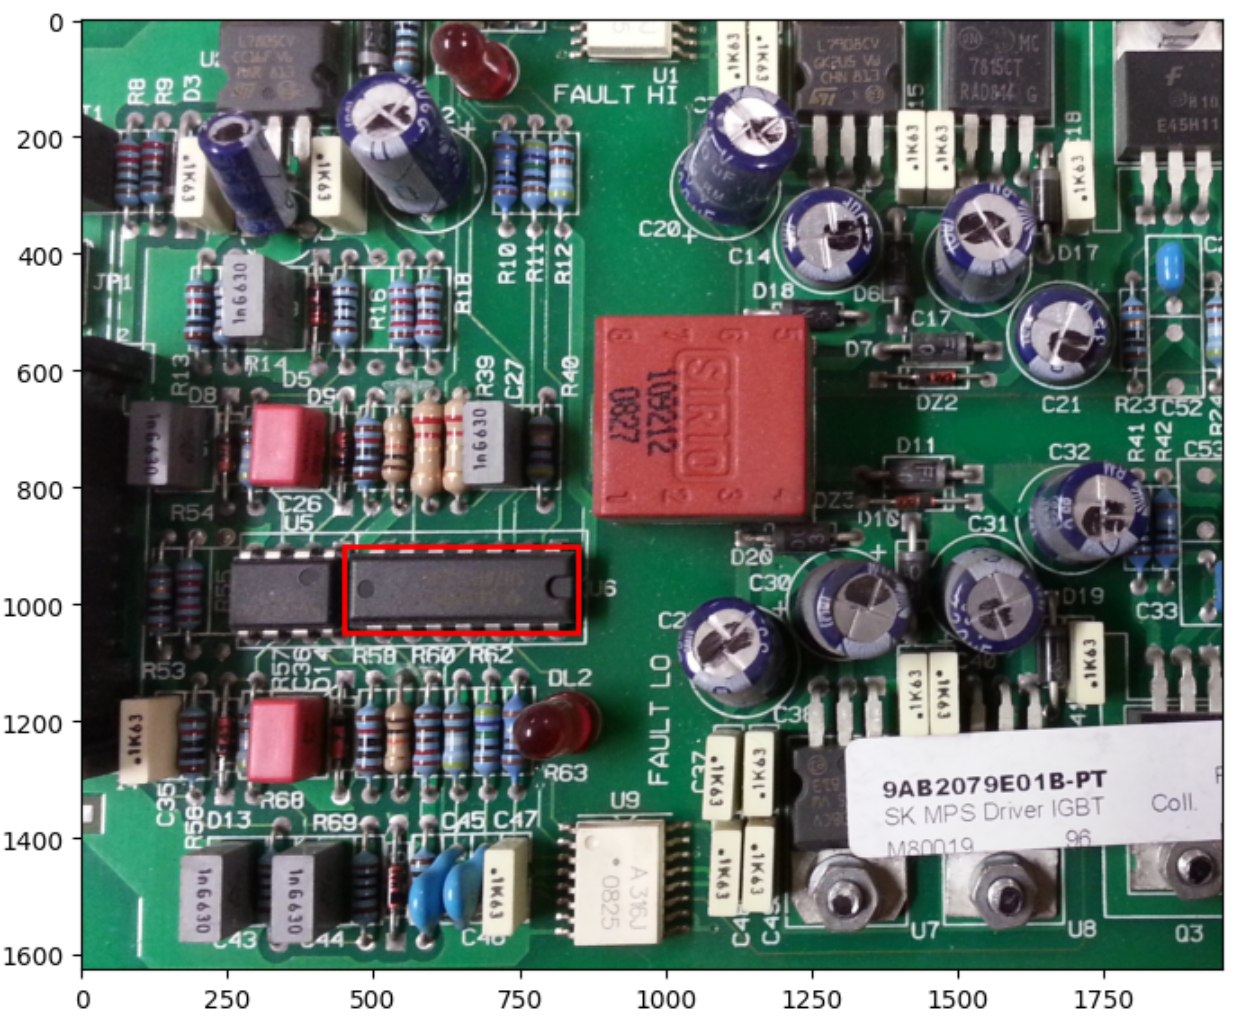
And we’ll use the API to find all the microchips in Google’s example processor board image:

Google’s example processor board image

Let’s get started!

Installation

We’ll get started by following the installation instructions in the OWL-ViT inference playground notebook

The scenic package itself is distributed as a pip package from their GitHub repo. We can clear out the local files, clone the repo and install the scenic package:


!rm -rf *
!rm -rf .config
!rm -rf .git
!git clone https://github.com/google-research/scenic.git .
!pip install .

Scenic comes bundled with many projects, of which OWL-ViT is just one. Each project comes with its own additional environment requirements. Let’s install OWL-ViT’s:


!pip install -r ./scenic/projects/owl_vit/requirements.txt

Additionally, OWL-ViT depends on Google Research’s big_vision library. This library is distributed as raw source code, so let’s check that out and put it in the Python path:


!mkdir /big_vision
!git clone https://github.com/google-research/big_vision.git /big_vision
!pip install -r /big_vision/big_vision/requirements.txt
import sys
sys.path.append('/big_vision/')

It’s worth noting that subsequent versions of bokeh have broken OWL-ViT, so let’s make sure we have a working version:


!pip install --upgrade bokeh==2.4.3

We’ll use Modelbit to deploy the model, so let’s install that too:


!pip install --upgrade modelbit

Finally, let’s proceed with the imports that we’re going to need to make this model a reality:


from matplotlib import pyplot as plt
import numpy as np
import PIL
import urllib
from scenic.projects.owl_vit import models
from scenic.projects.owl_vit.configs import clip_b16 as config_module
from scenic.projects.owl_vit.notebooks import inference
from scenic.model_lib.base_models import box_utils

Building The OWL-ViT Model

We’ll use OWL-ViT out of the box for this project. So to get started, let’s just pull down the default model configuration and checkpoints and preload the model:


config = config_module.get_config(init_mode='canonical_checkpoint')
module = models.TextZeroShotDetectionModule(
    body_configs=config.model.body,
    normalize=config.model.normalize,
    box_bias=config.model.box_bias)
variables = module.load_variables(config.init_from.checkpoint_path)
model = inference.Model(config, module, variables)
model.warm_up()

Working With The Model

To start, it’s important to understand how OWL-ViT works with images internally, and the format it expects for its bounding boxes. Here are our query and target images before and after OWL-ViT processes them:

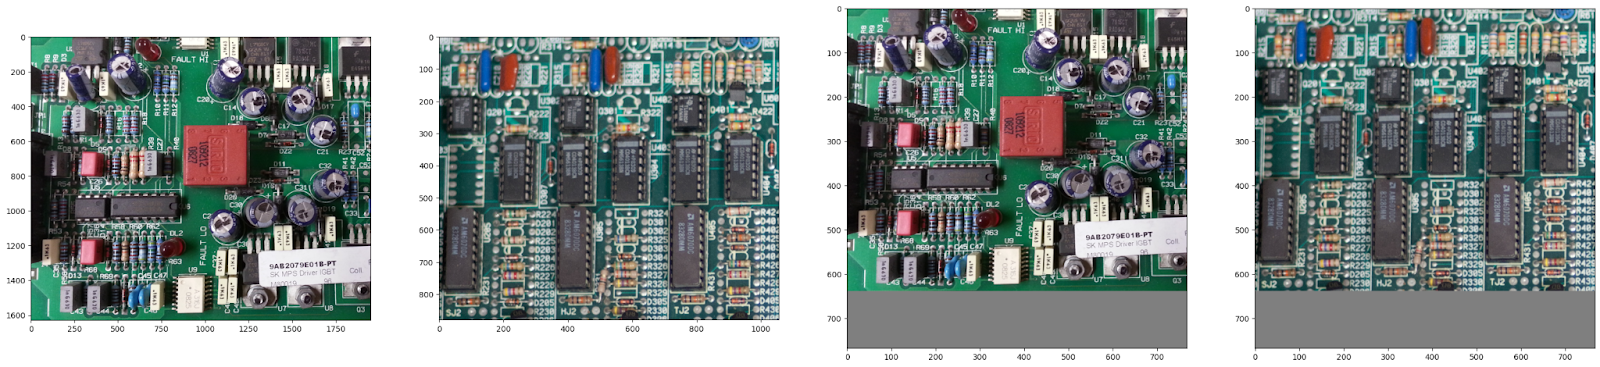
On the left are the query and target images as we supplied them. They’re different sizes, as we would expect from real-world images. The query image is about 1600x1800 and the target image is about 900x1100. (Both OWL-ViT and matplotlib use (y, x) coordinate schemes so we will stick with that for this post.)

OWL-ViT insists on 800x800 square images. It will resize the images down to that size while preserving the aspect ratio, and fill the resulting empty space with gray pixels. 

It then expects the prompt box in the format (y0, x0, y1, x1) where all four numbers are between 0.0 and 1.0. The top left coordinate is (0.0, 0.0) and the bottom right of the post-processed image including the gray pixels is (1.0, 1.0). 

Fortunately, we can get the exact processed image from the model by calling "model.preprocess_image(original_image)". Once we have the dimensions for both the pre- and post-processed query images, we’ll need to translate the bounding box on the axis that is being padded, like so:


if query_image_width > query_image_height:
  delta = (query_image_width - query_image_height) / (query_image_height / processed_query_image_height)
  y0 -= delta
  y1 -= delta
else:
  delta = (query_image_height - query_image_width) / (query_image_width / processed_query_image_width)
  x0 -= delta
  x1 -= delta

Then we’ll need to scale it to match the new 800x800 dimensions:


y0 = float(y0) / query_image_height * processed_query_image_height
  y1 = float(y1) / query_image_height * processed_query_image_height
  x0 = float(x0) / query_image_width * processed_query_image_width
  x1 = float(x1) / query_image_width * processed_query_image_width

Finally we’ll need to scale it down to a number between 0.0 and 1.0:


prompt_box = (
  float(y0) / processed_query_image_height, 
  float(x0) / processed_query_image_width, 
  float(y1) / processed_query_image_height, 
  float(x1) / processed_query_image_width
)

Here’s the full code for scaling your bounding box from coordinates on your original query image to coordinates that the OWL-ViT model will work with:


def prompt_box_for_query_image(query_image, y0, x0, y1, x1):
    query_image_height = query_image.shape[0]
    query_image_width = query_image.shape[1]

    # Model will give us a preprocessed image that's a square of a certain size
    processed_query_image = model.preprocess_image(query_image)
    processed_query_image_height = processed_query_image.shape[0]
    processed_query_image_width = processed_query_image.shape[1]

    # Translate bounding box from coords on raw image to coords on preprocessed image
    if query_image_width > query_image_height:
        delta = (query_image_width - query_image_height) / (
            query_image_height / processed_query_image_height
        )
        y0 -= delta
        y1 -= delta
    else:
        delta = (query_image_height - query_image_width) / (
            query_image_width / processed_query_image_width
        )
        x0 -= delta
        x1 -= delta

    y0 = float(y0) / query_image_height * processed_query_image_height
    y1 = float(y1) / query_image_height * processed_query_image_height
    x0 = float(x0) / query_image_width * processed_query_image_width
    x1 = float(x1) / query_image_width * processed_query_image_width

    # Model wants (y, x, y, x) on the processed image normalized to between 0 and 1
    prompt_box = (
        float(y0) / processed_query_image_height,
        float(x0) / processed_query_image_width,
        float(y1) / processed_query_image_height,
        float(x1) / processed_query_image_width,
    )
    return prompt_box

Those with a very close eye for matplotlib will notice we use a helper function for easy drawing of bounding boxes on Matplotlib images. Here’s that code:


def show_box(box, ax, color='r'):
  y0, x0, y1, x1 = box
  ax.add_patch(plt.Rectangle((x0, y0), x1 - x0, y1 - y0, linewidth=2, edgecolor=color, facecolor='none'))

Getting Inferences

We want to supply image URLs to our API at request time, so that means our Python code will need to pull down the images from those URLs, like so:


query_image = np.array(PIL.Image.open(urllib.request.urlopen(query_image_url)))
target_image = np.array(PIL.Image.open(urllib.request.urlopen(target_image_url)))

Once we have a prompt_box from our prompt_box_for_query_image function above, we’ll use three calls to get the bounding boxes on the target image. Here they are:


_, _, target_boxes = model.embed_image(target_image)
query_embedding, _ = model.embed_image_query(query_image, prompt_box)
_, scores = model.get_scores(target_image, query_embedding[None, ...], num_queries=1)

Let’s take these in order. First, the call to "model.embed_image" returns bounding boxes for every single object found using OWL-ViT’s zero-shot detection on the target image. On this image, that’s over 2,000 objects and therefore 2,000 bounding boxes. 

Next, the call to "model.embed_image_query" gets an embedding for the object found using the bounding box on the query image. This is super cool: We now have a representation of the microchip object from the query image that is portable across images! Once a microchip is found, we can look for a microchip in any supplied image. 

Finally, by passing that embedding to "model.get_scores", we get back a score for every object in the target image. So of those 2,000+ bounding boxes, each one gets a score from 0 to 1 of how similar it is to the object represented by the embedding, i.e., the microchip.

Reformatting The Output Bounding Boxes

Unhelpfully, OWL-ViT returns its bounding boxes in an internal (cx, cy, w, h) format. Fortunately they supply a helper method to convert that to the (y0, x0, y1, x1) format between 0.0 and 1.0 that we supplied on the target image. Here’s that code:


box = box_utils.box_cxcywh_to_yxyx(target_box)

But remember, these coordinates will be on the processed square image with the gray padding. We’ll need to scale those to real dimensions on the originally-supplied, non-processed target image in order to be useful to the callers of our API.

Fortunately, this is just a matter of discovering which axis has the larger multiplier to get to the original dimensions, and then multiplying both axes by the larger multiplier! This will take care of the translation and the scaling in one step:


if target_image_height > target_image_width:
    multiplier = target_image_height
else:
    multiplier = target_image_width
box_coords = [
    float(box[0]) * multiplier,
    float(box[1]) * multiplier,
    float(box[2]) * multiplier,
    float(box[3]) * multiplier,
]

To put it all together, we’ll insert the above scaling code into a loop that looks at every bounding box on the target image, picks out the boxes with high scores, and scales those boxes to real coordinates. 

Putting It All Together

We’ve seen how to download the images from the supplied URLs, how to scale the input bounding box to a format the model expects, how to get inferences from the model, and how to scale those inferences back out to a useful format. 

Here’s all the code put together in one inference function:


THRESHOLD = 0.955

def owl_vit_for_object_detection(query_image_url, target_image_url, y0, x0, y1, x1):
    # Download images
    query_image = np.array(PIL.Image.open(urllib.request.urlopen(query_image_url)))
    target_image = np.array(PIL.Image.open(urllib.request.urlopen(target_image_url)))

    # Matplotlib setup
    plt.figure()
    f, axs = plt.subplots(1, 2, figsize=(18, 18))

    # Render query image and bounding box
    axs[0].imshow(query_image)
    show_box((y0, x0, y1, x1), axs[0], "r")

    # Convert input bounding box to format model wants for its prompt
    prompt_box = prompt_box_for_query_image(query_image, y0, x0, y1, x1, axs[2])

    # Render target image
    axs[1].imshow(target_image)

    # Generate embeddings and prompt the model
    # "target_boxes" is bounding boxes (in internal model format) for every object found on the target image
    _, _, target_boxes = model.embed_image(target_image)

    # Generate an embedding for the particular object in the supplied prompt box on the query image
    query_embedding, _ = model.embed_image_query(query_image, prompt_box)

    # "scores" is an array of scores, same length as "target_boxes", scoring the box's relevance to the query embedding
    # Higher score = more likely to be the same type of object as the object in the embedding
    _, scores = model.get_scores(
        target_image, query_embedding[None, ...], num_queries=1
    )

    # Begin the process of translating bounding boxes back to the dimensions of the target image
    target_image_height = target_image.shape[0]
    target_image_width = target_image.shape[1]
    processed_target_image = model.preprocess_image(target_image)
    processed_target_image_height = processed_target_image.shape[0]
    processed_target_image_width = processed_target_image.shape[1]

    # Iterate over candidate boxes, convert them back to dimensions of original target image, render and save
    final_boxes = []
    for i, score in enumerate(scores):
        if score > THRESHOLD:
            # Convert internal representation to (y, x, y, x) where each coord is between [0, 1],
            # relative to the processed (not raw) target image
            box = box_utils.box_cxcywh_to_yxyx(target_boxes[i])

            # Translate from (y, x, y, x) between 0 and 1 in the processed image, to real coords of the raw image
            if target_image_height > target_image_width:
                multiplier = target_image_height
            else:
                multiplier = target_image_width
            box_coords = [
                float(box[0]) * multiplier,
                float(box[1]) * multiplier,
                float(box[2]) * multiplier,
                float(box[3]) * multiplier,
            ]

            # Render and save
            show_box(box_coords, axs[1], "b")
            final_boxes.append(box_coords)

    mb.log_image(f)

    return final_boxes

The output of this function is pretty damn cool:

Deploying The Model To REST

Now that we’ve got OWL-ViT code working in a deployable way, let’s deploy it to a production cloud environment! Fortunately, Modelbit makes this easy. First let’s login to Modelbit from our notebook:


import modelbit
mb = modelbit.login()

And now let’s deploy it!


mb.deploy(
    owl_vit_for_object_detection,
    python_packages=[
        "git+https://github.com/google-research/scenic.git",
        "git+https://github.com/openai/CLIP.git",
        "torch==2.0.1+cu118",
        "torchvision==0.15.2+cu118",
        "tqdm==4.66.1",
        "scikit-image==0.19.3",
        "einops==0.6.1",
        "ott-jax==0.3.1",
    ],
    extra_files={"/big_vision/big_vision": "big_vision"},
    skip_extra_files_dependencies=True,
)

We simply pass the inference function, "owl_vit_for_object_detection", to "modelbit.deploy"! 

We’ve made several optional choices in calling "mb.deploy" that are worth explaining here. First, we specify the git URL of the scenic package so that Modelbit will install it in production the same way we installed it in the notebook. Modelbit will also automatically install all of scenic’s specified dependencies, which is convenient.

Next, you’ll remember that we installed additional OWL-ViT dependencies and "big_vision" dependencies. We went ahead and manually specified the ones we’re using. Finally, since "big_vision" was installed as a raw source directory, we instruct Modelbit to install it the same way.

Now that we’ve deployed the model, Modelbit will give us REST as well as SQL APIs directly to the model!

We can call it from REST giving it the URLs of our query image and target image, and the bounding box for the object in our query image. The model will return the bounding boxes for the same object in the target image!


% curl -s -XPOST "https://harrys-house.app.modelbit.com/v1/owl_vit_for_object_detection/latest"
-d '{"data": ["https://doc.modelbit.com/img/printed_circuit_board.jpg",
"https://doc.modelbit.com/img/processor_board.jpg", 900, 450, 1050, 850]}' |
json_pp

{
   "data" : [
      [
         171.108853340149,
         369.398735046387,
         305.525058746338,
         474.663591384888
      ],
      [
         167.576173782349,
         721.442836761475,
         299.468353271484,
         828.72229385376
      ],
      [
         176.72588968277,
         14.5475785732269,
         310.037784576416,
         129.05407834053
      ],
      [
         300.126826286316,
         184.22314453125,
         525.569254875183,
         291.434749603271
      ],
      [
         296.286043167114,
         363.289315223694,
         522.991098403931,
         479.402249336243
      ],
      [
         296.896522521973,
         535.516342163086,
         523.173946380615,
         650.528285980225
      ],
      [
         297.879086494446,
         716.790504455566,
         519.8344373703,
         831.569686889648
      ],
      [
         286.913967132568,
         887.294134140015,
         520.519535064697,
         993.960908889771
      ],
      [
         507.204803466797,
         361.860583305359,
         798.3112449646,
         481.195607185364
      ],
      [
         507.2512550354,
         711.642688751221,
         792.637355804443,
         828.554992675781
      ],
      [
         512.875230789185,
         7.93288385868073,
         799.73708152771,
         129.754951000214
      ]
   ]
}

Taking a look at the Modelbit logs, we can eyeball the images themselves to confirm that the model is succeeding:

We also see it only took about two seconds to get inferences in production. Not bad! We can now use our REST API to pick out objects in one image and identify matching objects in any other image. All in just a couple of seconds.

Want more tutorials for deploying ML models to production?

Deploy Custom ML Models to Production with Modelbit

Join other world class machine learning teams deploying customized machine learning models to REST Endpoints.
Get Started for Free